Thursday, August 22, 2013

Chili Relleno Casserole

I made these for dinner tonight, and they were really delicious. I suppose it's easy to please just two people, but Isaac had never had chili relleno's before, and these babies made a big impression. He stated twice, "These are good." Yes, twice. And he even went back for seconds. I was also watching him from the reflection in our living room window as he made his way to the kitchen to drop off his dish, and watched him sneak a few more bites. So, there you have it. It was pretty simple to make too. I served it with Mexican rice. If I would have had refried beans to dish up with it, I could have closed my eyes and thought I was eating a meal at El Farol. 


Chili Relleno Casserole 


l lg. can whole green chilis*

l lb. each shredded cheddar and Jack cheese
3 eggs
3 T. flour
l 5 oz. can evaporated milk
l regular size can tomato sauce**

DIRECTIONS: Rinse chilis, remove seeds, slice them open so they lay flat and drain on a paper towel. Make 3 layers of chilis and cheese in a square baking dish (or use more chili's and use an 8x11 pan). Mix flour and milk together with a wisk. Beat the eggs separately and add to milk mixture. Pour over layered chili and cheese and bake at 350 for 30 min. Remove from oven and add another thin layer of cheese and drizzle the tomato sauce over that. Return to oven for 10 min.

*Had a hard time finding a large can of these, so instead ended up buying three (should have bought four) small cans. They are right next to the small cans of diced chiles (and look just like the small can of chilis, except they say "whole" on the can instead of "diced), if that helps you locate them easier at the grocery store.

**I added the sauce to the blender with 1/2 a can of diced tomatoes (that I already had in our fridge) to make it more tomatoey, and added a dash of olive oil, a teaspoon of minced garlic and a shake of salt. 

Friday, August 16, 2013

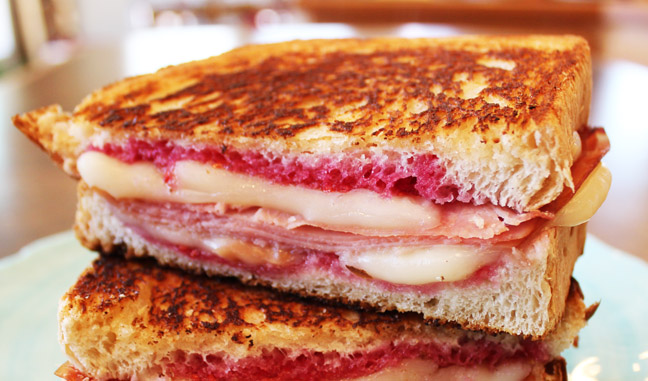
Deluxe Grilled Ham & Cheese with Jam

Okay, I know this isn't a real "recipe," but this quick and easy version of the grilled cheese sandwich has changed my view on the American staple. I don't think I can ever eat a grilled cheese sandwich without jam, ever again.


Ingredients:
2 slices of sour dough bread (or more if you're making this for multiple people)
Slices of cheddar cheese (or whichever kind of cheese you prefer)
Several slices of thin cut deli ham
Raspberry or strawberry jam
butter for spreading on bread

We all know how to make a grilled cheese sandwich, so I won't elaborate on the instructions, but before you grill the sandwich, add a big slab of jam to the side of bread that touches the ham. It sort of makes this taste like a Monte Cristo sandwich, which is one of my all time favorites, but this takes 1/10 of the time and is still incredibly tasty. The added grilled fruit burst is delicious!

I discovered this gem when trying to figure out easy things to make after we both got off work. Isaac is one of the most impatient eaters I know. "If you can't make it in 30 seconds, it's not worth waiting for," kind of mentality. So, I've had to learn how to whip up some really quick, easy things, otherwise he makes his own creations (which aren't good). I actually made this for myself one night, after I came home from work and Isaac had been home for a while and had already made himself "cheesy bread"... microwaved bread with slices of cheese on it. Boring. So, I came up with this for myself, and ooohed and ahhed over it the whole time I was eating it. I let him have a bite, being the nice wife that I am, and he wanted his own.  It's just good. That is all. Try it some time if you're not in the mood to make something elaborate, but are in the mood to eat something delicious!

Thursday, August 1, 2013

Asian Noodle Salad

I could have sworn I had posted this recipe a long time ago, but when I went to search for it today nothing came up. Tragic I've kept this recipe from being in your lives for so long. It is delicious and every time I have made it people have asked for the recipe. Not only is it delicious, but for those who are health-minded, it is also healthy. Furthermore, for those who are into aesthetically pleasing food, it is also very colorful. Without further adieu, here is the Asian Noodle Salad...  Mmmm...


Asian Noodle Salad

I got this recipe from the Pioneer Woman blog, if I mustn't claim it for myself.
Serves: 6-8  (can also add chicken for extra protein, or to make it a meal)

SALAD INGREDIENTS:

1 package Linguine Noodles, Cooked, Rinsed, And Cooled

½ heads Sliced Napa Cabbage, Or More To Taste

½ heads Sliced Purple Cabbage, Or More To Taste

½ bags Baby Spinach, Or More To Taste

1 whole Red Bell Pepper, Sliced Thin

1 whole Yellow Bell Pepper, Sliced Thin

1 whole Orange Bell Pepper, Thinly Sliced

1 bag Bean Sprouts (also Called Mung Bean Sprouts)

Chopped Cilantro, Up To 1 Bunch, To Taste

3 whole Scallions, Sliced

3 whole Cucumbers Peeled And Sliced

1 can (about 10 Oz.) Whole Cashews, Lightly Toasted In Skillet

_____

FOR THE DRESSING:

1 whole Lime, Juiced

8 Tablespoons Olive Oil

8 Tablespoons Soy Sauce

2 Tablespoons (up To 3 Tablespoons) Sesame Oil

⅓ cups Brown Sugar

3 Tablespoons Fresh Ginger Chopped

2 cloves Garlic, Chopped

2 whole Hot Peppers Or Jalapenos, Chopped

Chopped Cilantro

Preparation Instructions:

Mix salad ingredients together. Whisk dressing ingredients together and pour over salad. Mix with tongs or hands and serve on a platter.

Note: dressing keeps for up to three days before serving, without cilantro.

Tuesday, July 23, 2013

Chocolate Oatmeal Flaxseed Muffins

These are seriously so good, and they taste even better when you know there is a lot of healthy stuff inside.
This blog describes it all:
http://www.pastryaffair.com/blog/chocolate-oatmeal-flaxseed-muffins.html
The only thing I changed is that I substituted coco powder for the espresso powder, in equal amount. Still totally great.

Saturday, March 16, 2013

PIzza dough

This is the best pizza dough.  But you have to cook it with a pizza stone in your oven on the hottest setting you have.  That is the secret.

Peter Reinhart's Napoletana Pizza Dough Recipe

Heidi notes: Peter's recipe says the olive (or vegetable oil) is optional. I use it every time - always olive oil, not vegetable oil. I love the moisture and suppleness it adds to the dough, and it makes your hands soft too.
4 1/2 cups (20.25 ounces) unbleached high-gluten, bread, or all-purpose flour, chilled
1 3/4 (.44 ounce) teaspoons salt
1 teaspoon (.11 ounce) instant yeast
1/4 cup (2 ounces) olive oil (optional)
1 3/4 cups (14 ounces) water, ice cold (40°F)
Semolina flour OR cornmeal for dusting
1. Stir together the flour, salt, and instant yeast in a 4-quart bowl (or in the bowl of an electric mixer). With a large metal spoon, stir in the oil and the cold water until the flour is all absorbed (or mix on low speed with the paddle attachment), If you are mixing by hand, repeatedly dip one of your hands or the metal spoon into cold water and use it, much like a dough hook, to work the dough vigorously into a smooth mass while rotating the bowl in a circular motion with the other hand. Reverse the circular motion a few times to develop the gluten further. Do this for 5 to 7 minutes, or until the dough is smooth and the ingredients are evenly distributed. If you are using an electric mixer, switch to the dough hook and mix on medium speed for 5 to 7 minutes, or as long as it takes to create a smooth, sticky dough. The dough should clear the sides of the bowl but stick to the bottom of the bowl. If the dough is too wet and doesn't come off the sides of the bowl, sprinkle in some more flour just until it clears the sides. If it clears the bottom of the bowl, dribble in a tea- spoon or two of cold water. The finished dough will be springy, elastic, and sticky, not just tacky, and register 50 to 55F.
2. Sprinkle flour on the counter and transfer the dough to the counter. Prepare a sheet pan by lining it with baking parchment and misting the parchment with spray oil (or lightly oil the parchment). Using a metal dough scraper, cut the dough into 6 equal pieces (or larger if you are comfortable shaping large pizzas), You can dip the scraper into the water between cuts to keep the dough from sticking to it, Sprinkle flour over the dough. Make sure your hands are dry and then flour them. Lift each piece and gently round it into a ball. If the dough sticks to your hands, dip your hands into the flour again. Transfer the dough balls to the sheet pan, Mist the dough generously with spray oil and slip the pan into a food-grade plastic bag.
3. Put the pan into the refrigerator overnight to rest the dough, or keep for up to 3 days. (Note: If you want to save some of the dough for future baking, you can store the dough balls in a zippered freezer bag. Dip each dough ball into a bowl that has a few tablespoons of oil in it, rolling the dough in the oil, and then put each ball into a separate bag. You can place the bags into the freezer for up to 3 months. Transfer them to the refrigerator the day before you plan to make pizza.)
4. On the day you plan to make the pizza, remove the desired number of dough balls from the refrigerator 2 hours before making the pizza. Before letting the dough rest at room temperature for 2 hours, dust the counter with flour, and then mist the counter with spray oil. Place the dough balls on top of the floured counter and sprinkle them with flour; dust your hands with flour. Gently press the dough into flat disks about 1/2 inch thick and 5 inches in diameter. Sprinkle the dough with flour, mist it again with spray oil, and cover the dough loosely with plastic wrap or a food-grade plastic bag. Now let rest for 2 hours.
5. At least 45 minutes before making the pizza, place a baking stone either on the floor of the oven (for gas ovens), or on a rack in the lower third of the oven. Heat the oven as hot as possible, up to 800F (most home ovens will go only to 500 to 550F, but some will go higher). If you do not have a baking stone, you can use the back of a sheet pan, but do not preheat the pan.
6. Generously dust a peel or the back of a sheet pan with semolina flour or cornmeal. Make the pizzas one at a time. Dip your hands, including the backs of your hands and knuckles, in flour and lift I piece of dough by getting under it with a pastry scraper. Very gently lay the dough across your fists and carefully stretch it by bouncing the dough in a circular motion on your hands, carefully giving it a little stretch with each bounce. If it begins to stick to your hands, lay it down on the floured counter and reflour your hands, then continue shaping it. Once the dough has expanded outward, move to a full toss as shown on page 208. If you have trouble tossing the dough, or if the dough keeps springing back, let it rest for 5 to 20 minutes so the gluten can relax, and try again. You can also resort to using a rolling pin, though this isn't as effective as the toss method.
7. When the dough is stretched out to your satisfaction (about 9 to 12 inches in diameter for a 6-ounce piece of dough), lay it on the peel or pan, making sure there is enough semolina flour or cornmeal to allow it to slide. Lightly top it with sauce and then with your other top- pings, remembering that the best pizzas are topped with a less-is-more philosophy. The American "kitchen sink" approach is counterproductive, as it makes the crust more difficult to bake. A few, usually no more than 3 or 4 toppings, including sauce and cheese is sufficient.
8. Slide the topped pizza onto the stone (or bake directly on the sheet pan) and close the door. Wait 2 minutes, then take a peek. If it needs to be rotated 180 degrees for even baking, do so. The pizza should take about 5 to 8 minutes to bake. If the top gets done before the bottom, you will need to move the stone to a lower self before the next round. if the bottom crisps before the cheese caramelizes, then you will need to raise the stone for subsequent bakes.
9. Remove the pizza from the oven and transfer to a cutting board. Wait 3 to 5 minutes before slicing and serving, to allow the cheese to set slightly.

Monday, March 11, 2013

Baked Zucchini Chips

I'm sure I'm breaking a rule, but I am just going to link to another blog and I'm too tired to care. I made these tonight and they were good and Joy thought I should share.
Here it is:
Baked Zucchini Chips
Just a hint: they have to get fairly brown before they turn crisp.
Another hint: if you have a food processor, use it to slice them thin and uniform. Otherwise, the slicer on a box grater would make it easier to slice these thin as well.

Tuesday, February 26, 2013

Italian Shrimp

I've become a bit obsessed with everything coconut oil these days. I supposed I've jumped on the coconut oil bandwagon, and for once, I'm proud of following a trend. Coconut oil is amazing. More on that later. I saw a recipe pinned on pinterest for this delicious sounding shrimp. Where the source came from, I will never know, since the pin doesn't actually lead you to a recipe, just a blog with a bunch of pictures.

I modified the recipe a little and John proclaimed this to be the best shrimp he's ever had, just like the pinned claimed it would be. Note: he didn't know this was supposed to be the best shrimp ever! :)

Image found here
Ingredients:
1 lb shrimp
1/2-1 cup coconut oil (the actual recipe calls for butter)
1 lemon
Italian seasoning

Directions:
Melt coconut oil/butter on a foiled line cookie sheet.
Thinly slice the lemon and place slices on top of the melted butter.
Place shrimp on top of the lemon slices and sprinkle with Italian seasoning to your liking. I used a generous amount. Bake at 350 degrees for 12-15 minutes. 

We mixed the shrimp into some leftover fried rice, and it was pretty darn good. This will definitely be a recipe we will recycle over and over again. I'm convinced the coconut oil is what made it SO good, but, you can never go wrong with something soaked in actual butter, either!